CSI – Major Case File 217

Say what you will about entering competitions, but there’s nothing like a good Challenge to get the creativity flowing. My favourite challenge site right now is CSI – Colour, Stories, Inspiration….it’s all there and I love being inspired by the wonderful layouts the DT and Guest Designers produce.

Major Case File 217 looks like this:

217-copy

My layout for this one is of our grandson….he visited us recently and got some yard work done  🙂 I’ve used all the colours. My Evidence ….woodgrain, heat embossing (the leaves on the background are heat embossed…clear, mushroomy brown and silvery grey – not really obvious in the photos though) a cute mouse and some butterflies, lots of leaves and a tiny bit of doodling. My Testimony…it’s all about Autumn   🙂  Loved the sketch too!

autumn_csi-217

A couple of close-ups…..he’s very cute, and he was very busy that day  🙂
autumn_2

autumn_3
autumn_1

On to the next Case File….#218

218-copy

See you soon   🙂

ATC Swap – October / November

I just love an ATC swap….I love thinking about the theme while I’m walking, cleaning the pool and lying on the accupuncture table (this is where I do my BEST thinking!)

I love making the first ‘prototype’ little card, then repeating it four, five, six or more times, I love how they evolve and turn out completely different to my original idea, and I LOVE getting a little parcel of beautiful cards in the mail when the swap is over   🙂

This time the theme of our swap was ”Life’s a Beach”. A coastal or beach theme including a marine creature. For me, mermaids are the best sea creatures around, so that was my choice.

lifes-a-beach_mermaid

The mermaid is a digital stamp from Tiddly Inks and I’ve coloured her using Chameleon Pens. So relaxing.

mermaid

There’s a break from swapping now for Christmas, but we’ll start again in February. You’ll find us at Ideal ATC Swap. Think about joining in!

Thanks for stopping by   🙂


I think I’m back……

Well, it’s been a very long time since I paid any attention to my blog!

Since my last post so much has happened and life has changed a lot!

First, as my previous post says, I went off to London and became somebody’s Nanna – and I LOVE it! My little baby Piglet was born in December in cold, pre-Christmas London and she is the most beautiful, most amazing thing ever.

img_1216

After spending a too brief time adoring her, I left my gorgeous daughter and her fantastic husband to come back home for the family Christmas. Before I left I put up our Christmas tree with just Gold and Silver baubles …. when I got home I added lots and lots of PINK! Can’t find a photo right now, but it looked very pretty  🙂

As soon as the feast went down we moved into pre-wedding chaos. My London family arrived and my son married the love of his life in January. It was a beautiful day – everybody was there, everybody was happy and the sun shone on us all.

anna-scott_0122

So during all that time, and all the time since (I can’t believe it’s September already!!) I have sadly neglected what I love doing most – exercising my creative side. It’s worth acknowledging that work has been frantic from March to July, but still, all I have done in months and months is three sets of ATC’s for my favourite bi-monthly swap, and two layouts….TWO!!!

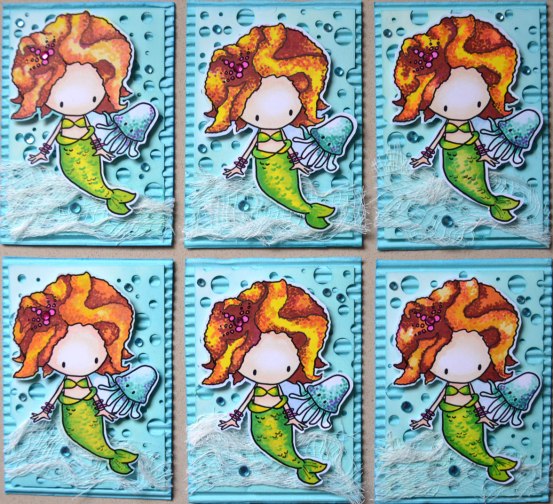
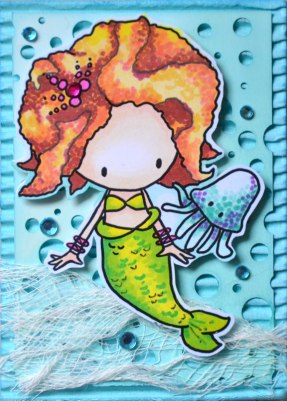
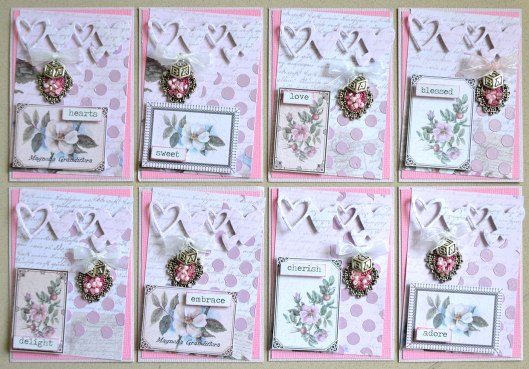
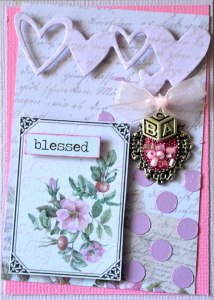
The first ATC set was ”Baby Love” – my so sweet online friends celebrated with me and set the criteria for this swap to mirror my life  🙂 Each ATC had to have two things –  a heart and a frame. This was my set:

baby-love-set

baby-love

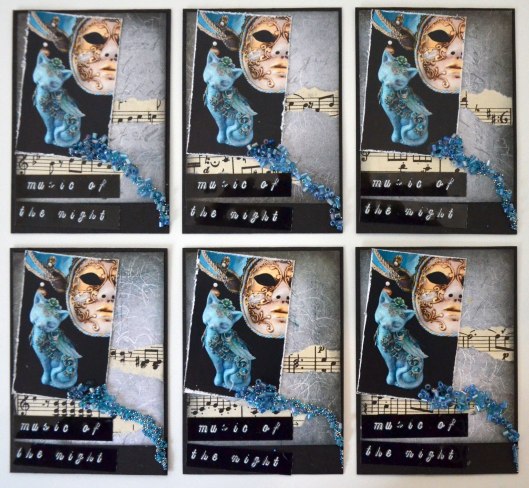
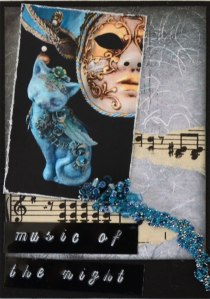
For the second set the theme was ”Cats”. Each ATC had to have a musical element and at least one cat. I came up with this one – inspired by the musical, my mixed media cat statue and my Venetian mask this is what I came up with:

cats-music-of-the-night-set

music-of-the-night-single

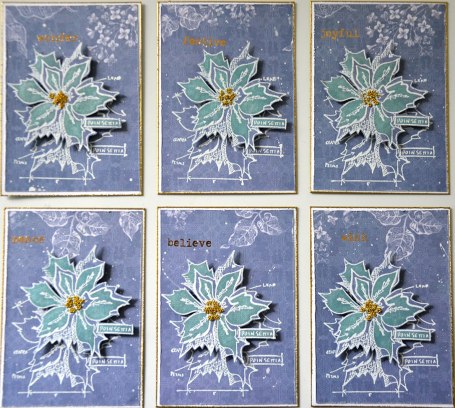
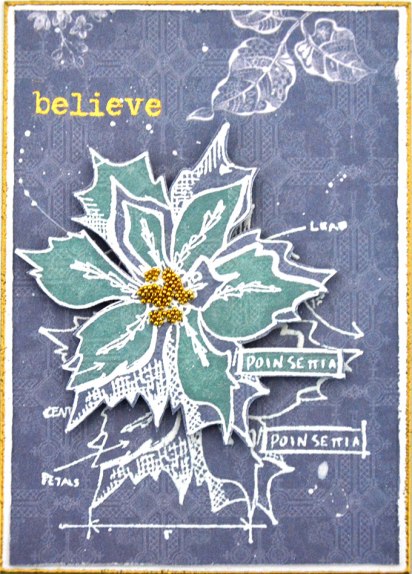
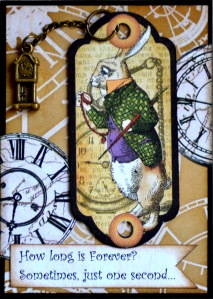
The third and most recent swap was smaller, but I totally loved the theme, ”Alice in Wonderland”. This one needed to include a character from the book and a well known quote. I adore the white rabbit – such a philosopher  🙂 This was mine…just a single card this time – I forgot to photograph them all together, but they were all the same:

alice-in-wonderland

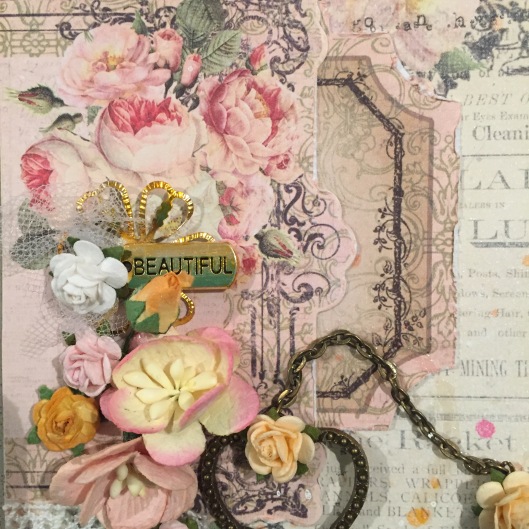
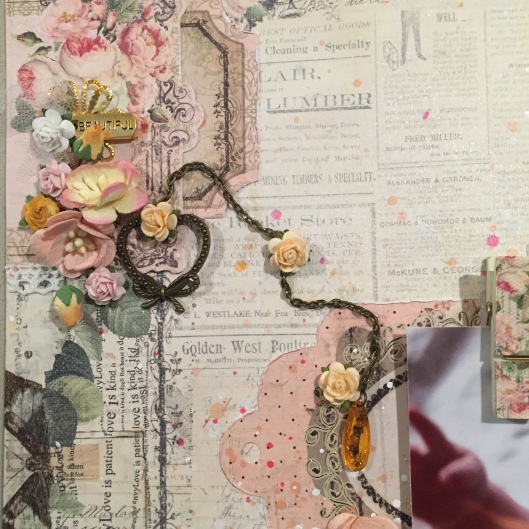
All these cards have elements from my2angels…sadly Tracy has had to close her online store, but she is still making gorgeous hand made embellishments and excellent mixed media scrapbooking kits. You can find her on Facebook: my2angels

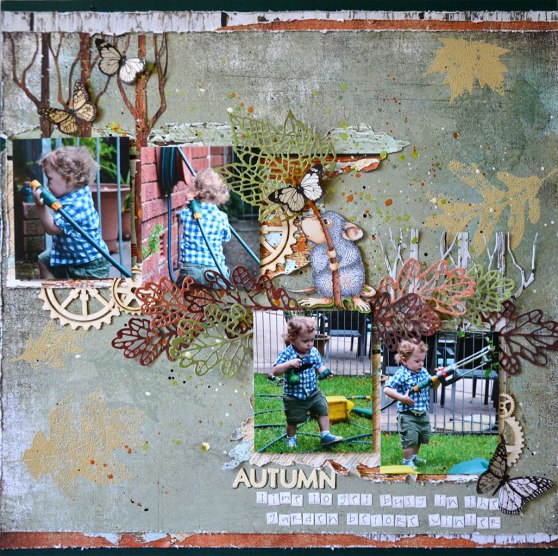
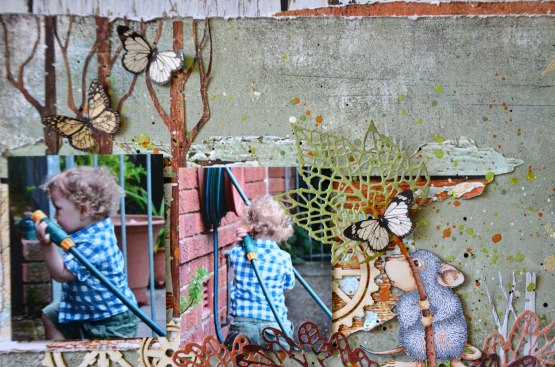
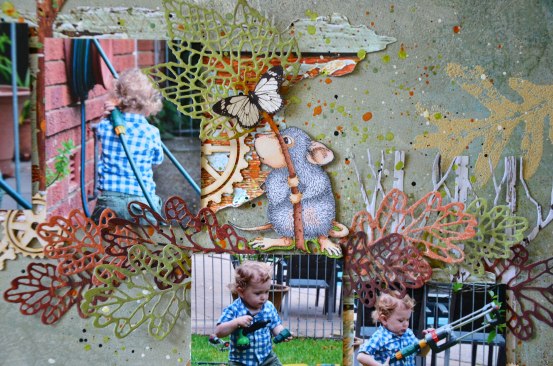
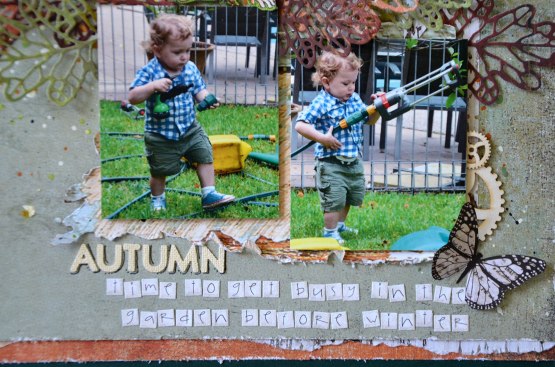
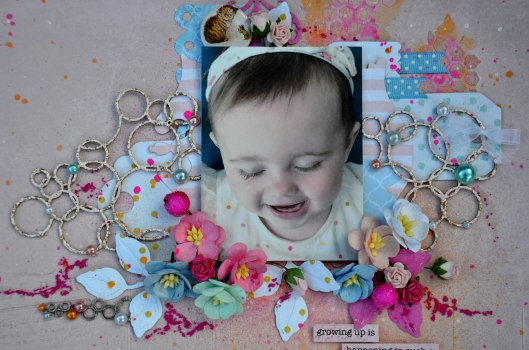
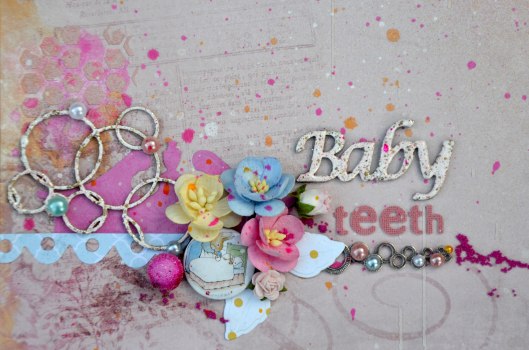
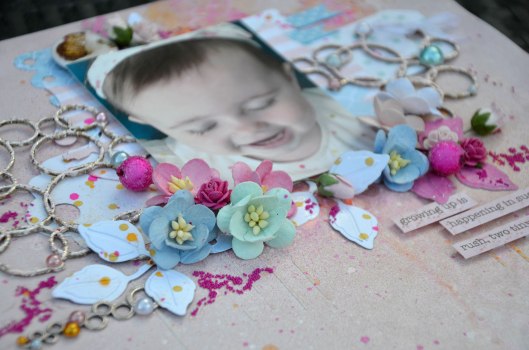
My two layouts both feature Tracy’s handmade pretty embellishments. They also feature the beautiful Miss A…..she is growing up so fast!

beautifulimg_1879img_1880

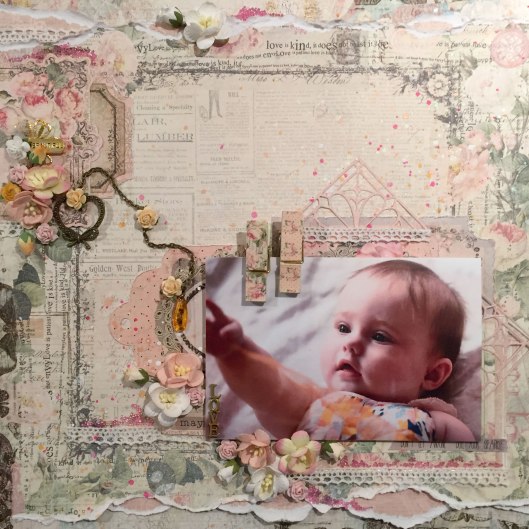
And number two…the latest:

baby-teeth


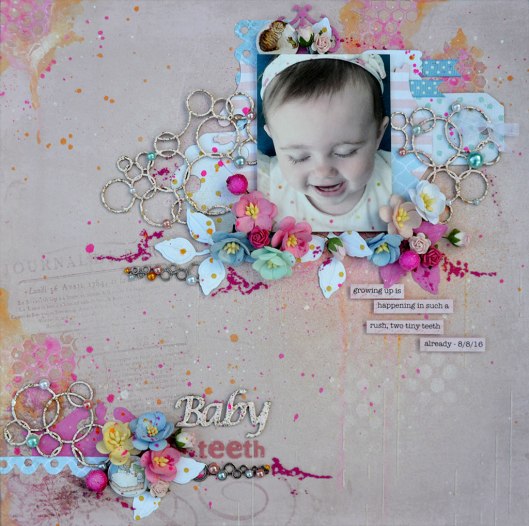
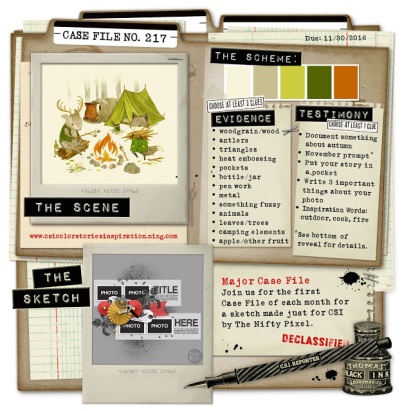
On this one I used a Chippie and Charm kit from Tracy…”Circles”. I also entered it for one of the Challenges over at CSI – Colour, Stories, Inspiration. A fantastic challenge website with awesome amounts of inspiration.

baby-teeth_1

baby-teeth_2

baby-teeth_3

There have been other things keeping us busy lately too – important things, but they are sadder and I’d rather leave them in the background for now.

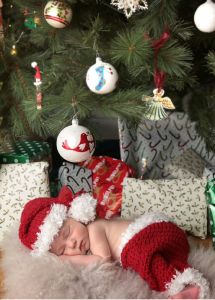
So – I think maybe, finally I’m back on track. I hope so. I just printed a cute photo of my hubbie’s (and mine too of course) Grandson Master R. CSI have another great challenge up that I may just have to enter  😉

Thanks for not forgetting me!!

Michele  🙂

Home Before Christmas

This was my last layout before I rushed out the door and onto a flight for freezing London and the birth of my brand new grandchild!

BUT – I was going to be home in time for Christmas – so decided to use Kaisercraft’s Home for Christmas range for my layout.

Inspiration for this layout came from the brand new Chippie and Charm packs available now at my2angels. This one is called Candid Camera, and contains two chipboard Filmstrips – slightly different in size, a chipboard ”Smile” inside a scribbled circle and three silver charms – a camera, a small ”laugh” charm and a larger ”Remember the Moments” pendant charm.

I printed my photos in a filmstrip style – these were taken last Christmas – and arranged them between the two chipboard pieces. All my chipboard was heat embossed using the Emboss-It Dabber and White Embossing Powder. The embossing is two or three layers thick, giving it that nice almost pure white look.

A piece of Green & White Bakers Twine is looped in and around the bottom of the film strips and photos, and I have threaded the three silver charms from the kit onto it.

The cute ”Smile” chipboard sits at the top, offset on a Christmas Memories sticker from the Home for Christmas Sticker sheet included in the paper pack.

The flowers are White Pointsettias, White Cherry Blossoms, White Hip Rosebuds, White Stamen Berry Spray Clusters, Green Foam Artificial Berries with Sugar Coating and Green 1cm Roses.

Also scattered around the page are some dots made with Evergreen Pearl Drops and a few Clear Rhinestone Dots. The two Christmas Tickets in the photo below are also stickers from the Kaisercraft Home for Christmas Paper Pack. 

I wish each and every one of you, and everyone you love a very happy and safe New Year xxx

PS…It was a girl 🙂

OK – NOW it’s almost Christmas!

Since it is November and all the other holidays have been cleared away I think it’s OK to finally start on Christmas 🙂

 The papers, chipboard shapes and Ephemera I used for this layout are all from Couture Creations ”Christmas Emporium” collection.

These are lovely papers – double sided, two of each design in the pack, not too thin, not too thick….in fact they’re just right! A mix of Christmas designs in blue, grey, green, and red. There are birds, music, holly wreaths and sprigs, postage stamps and vintage photos to choose from – what more could you want!

I chose to use a blue/grey and white combination for my masculine layout

No title this time – but doesn’t he look like a Christmas Angel?

The background treatment for this layout is so simple, and something I haven’t done for quite a long time. Rather than my usual obsess over mixed media, texture paste and paint I have used heat embossing to create my snowy overlay. For the white edges of the papers I used the Emboss-it Dabber to wet the torn edges then dipped them in white embossing powder and heated. The snowflakes were stamped with Emboss-it ink and then heat embossed the same way. To add the extra white snow ”dots” on the top  I dabbed the embossing ink with an ink blending tool through the Kaisercraft 12×12 Christmas Quarters Template.


While I was in the embossing mood I also made the pointsettia flowers decorating this layout. I had previously made some ATC’s for my regular swap – the technique for this month was using bleach. I made an extra card for myself – you can see it on the bottom left of the photo. The pointsettia is stamped and embossed onto the same blue paper as the background. When you paint the petals with bleach they turn into that lovely lighter turquoise. I liked the effect so much that I repeated it several times for this layout 🙂 The centres are just a scatter of Silver Microbeads over a few dots of Glossy Accents

The ATC card and the photo are popped up on Kaisercraft Foam Tape.

Other flowers are Two tone Antique Blue roses, White half-open rosebuds and White Pointsettias. I substituted the orange stamens in the centre of the Pointsettias with a Clear Rhinestone Dot.

Two Large Silver Snowflakes and a Happy Silver Snowman are hanging down on some Silver chain and to finish off there is a scattering of Crushed Ice Sugar Beads.

In the bottom corner of my layout (for balance) is a gorgeous  Family Silver and White Charming Word. There’s another dangling Happy Silver Snowman charm there, and a Silver Spoon is not quite containg some more pretty Sugar Beads. The two chipboard shapes under the photo above come from the Christmas Emporium Chipboard Shapes pack and card with the wreath on it below comes from the Christmas Emporium Ephemera pack.

I guess I’m ALMOST ready for Christmas now 🙂


Final ATC’s for 2015

The last ATC swap for 2015 is done and dusted. The criteria for this one – Bottle Blonde – using bleach, and a touch of yellow or gold.

Here are my six ATC’s

Bottle-Blonde Bottle-Blonde_1

Some of the petals are painted with bleach to make the pretty turquoise colour. The touch of gold is around the edge of the card, in the rub-on word and the microbead centres.

I hope the six ladies I made them for are happy 🙂

No, still not Christmas here!

The wonderful thing about being a part of the scrapping world, and the enormous pool of creativity that goes with it, is that you can browse through the internet, Pinterest etc for hours and then find inspiration from your closest (cyber) friends.

That happened to me with this project. At the my2angels retreat I saw Tracy’s beautiful pink birdcage, and all the gorgeous other coloured ones that the ladies made from her kit and I thought to myself – Wow! That would look awesome for Halloween!!

Mind you, we don’t really celebrate Halloween here – a few chocolates in case the local kids drop in and we mostly eat them all ourselves 🙂 BUT I think this cage looks awesome anyway, by day….

….and by night.

Here’s what I used on the background…I repeated this on both sides:

Black Soot Distress Stain

Ferro Metal Effect Textured Paint (Graphite) – through a brick stencil

Some of the spider webs were stamped with Emboss-It ink and heat embossed with Zing Clear embossing powder, the others…more visible here, are the result of Emboss-It ink dabbed through a stencil using an Ink Blending Tool and then Perfect Pearls (Pearl) dry-brushed over the top. The Perfect Pearls powder clings to the ink and reflects the light beautifully. Because it’s dry brushed you can easily control the amount of shine and can blur and blend the edges.

Finally, around the edges, a few thick blobs of Viva Decor Transparent Crackle Paint with Licorice Twist Sugar Beads pressed in while it’s still wet.

There’s a battery operated tealight candle in the house…you can turn it on from the back and replace it easily. Here’s the back:

The bottom of the cage is covered with some muslin dipped in Black Soot Distress stain and scrunched up to dry. My little prison/house has just about the same treatment as the background…the Viva Decor Transparent Crackle Paint and Licorice Twist Sugar Beads are on the roof. Here are a few close-ups

The poor skeleton is chained to the house using some Antique Bronze Iron Chain and a jumpring, and this chain, along with some Black Iron Chain is also used on the house and on the outside of the cage. Have you noticed that the skeletons eyes (and the raven’s and owl’s eyes too) are Orange Rhinestones? He has a little Antique Bronze birdcage inside his birdcage with him.

An Antique Bronze Filigree Corner and an Antique Bronze Round Flower Filigree decorate the front of the house. The bat and the 13 on the number plate are from Tim Holtz’ Halloween Ideaology Remnant Rubs.

See if you can spot the 5 Black Spider Charms scattered through the cage…and there are 3 Skeleton Charms hanging around as well 🙂

All my scary chipboards were painted black first with Black Soot Distress Stain, and then I used a combination of Stampendous and Zing Embossing Powders on them. There’s some Aged Black, Aged Copper, Metallic Green and Apricot.

And finally – at the top some pretty (but not too pretty!!) flowers and more spider webby muslin.

Grey and Black Roses, Purple roses and tiny Rosebuds, Tangerine Cherry Blossoms, a black Skeleton Leaf, some large Bronze leaves and some Black Star Flowers. The ribbon is Black Scallop Edged Organza.

Going to hang it out on the 31st just so the kids know they can come here for treats 🙂

My final CSI Special Investigator layout

Hi! I’m back again, with my last layout for September at CSI. Case File #177.

177 flat


There are so many lovely Christmas ranges appearing, but it’s a bit too early still for me! I don’t mind getting a few cards together to send to special people, but when it comes to layouts….well the papers are beautiful and I’m using them, but sorry, there’s not a Christmas Tree in sight!

 My latest layout uses a few of the Kaisrcraft Home for Christmas papers available in the Paper Pack.

I’ve titled it ”Not happy” because my furry family member just hates rain. He can sense it coming well in advance of the first drops and immediately slinks off somewhere to hide. In this case he found our folded outdoor umbrella and put it to good use 🙂

The cardstock backgrounds here are Kaiser’s Latte Weave and Coconut Weave. In between the two, top and bottom are thin strips of ”Laurel”. There are a few references to Christmas on this paper, but I’ve disguised them by using some torn strips of tape from the Tim Holtz Idea-Ology Symphony 2pk.

There are four stages to the background on my white cardstock. First I cut a cloud shape from a spare piece of chipboard and using it as a mask, gently inked the edges using three shades of brown distress ink and an Ink Blending tool – first Antique Linen, then Vintage Photo and finally a very small amount of Walnut Stain. This was repeated across the page several times until I was happy with the outcome.

Next, white texture paste through the Kaisercraft 12×12 Leaves template….I don’t know if Tracy will have any of these templates in stock after the ”Creative Fun with Tracy from my2angels” class at Shelley’s Land though (I am sure she will order more in if you want one)! I love the way the ink colours can still be seen through the texture paste.

I’ve added a bit more colour using a small polka dot stencil and Champagne Modelling Creme, and then painted on some Silks acrylics in green and brown tones. Most of this is under the photos, but I have left the edges and some drips exposed.

The layers of paper under my photos are from ”Laurel” (both sides), ”Season”, and ”Poinsettia” with a piece of dictionary paper torn and tucked in between the layers. I have also die cut some labels and tags to add interest and to highlight the words ”rain” and ”umbrella”. My leaves are also die cut – this time using the ”Decoration” paper and a few pieces of plasterer’s tape add to the texture without being too intrusive.

My title….the happy part…is heat embossed using Stampendous Aged Embossing Enamel – Scarlet.

The detail – of course there are flowers. The Red and Cream Cherry Blossoms are old stock, but you can still get the Cream. There is also a 2 tone Brown Sweetheart Blossom, a Cream and Green Rosebud and a flower from the Seeing Green Flutterbies embellishment pack.

There is also the light green butterfly from this pack just underneath. A tiny Antique Bronze Bird on a Branch charm is dangling from one of my die cut labels, just for fun. There are hundreds of cute charms to choose from in the store here, and you can get the jump rings here.

Just a few added Stampendous Mica Flakes and some Sugar Beads add a pop of colour.

Because I hate my messy handwriting (I think most of us do!) my journaling strips were printed onto a piece of  ”Laurel” and popped up onto dimensional squares. Much tidier 🙂

The Home for Christmas Paper Pack has two of each of six lovely double sided papers included – that’s 12 different designs, plus a bonus Sticker Sheet. Plenty of room for creativity there – and you can even use it for your Christmas projects!!

Thanks for stopping by! 🙂


A couple of Cards and Tags

Kaisercraft 6.5” Paper Pads are absolutely perfect for making cards and tags for any occasion, but especially for Christmas!!

I’ve used the Silver Bells  paper pad this week to make these pretties….

and and A Touch of Gold to make these….

First the so very pretty, pink, blue and grey

 Silver Bells –  I used a Kaisercraft Pink Square Card and Envelope and a gorgeous pink and silver foiled paper as the base for this card.

I fussy cut the baubles from another sheet of paper, and die cut the pine needles from a third. I think the ribbon came with some chocolates last Christmas, but it was perfect for this card, and reflects the colour of the beads in the Silver and Pink Merry Christmas Charming Word embellishment beautifully. The biggest bauble is popped up on dimensional squares, and the smallest is hanging from a line of tiny pink pearls.

Because I like to have something pretty to write on, the insides of my cards are usually decorated as well. This time I cut two baubles from a Stacking Baubles die set (from Shelley’s Land of course!). Again the papers are from the Silver Bells 6.5” Paper Pad, as is the ”Seasons Greetings” tag. I finished it off with a shiny Silver Christmas Wreath charm.

For my tag, I embraced the blue. The base is an Inkssentials Manilla Tag #8 and is covered on both the front and the back with a blue and silver foiled piece from the Silver Bells 6.5” Paper Pad.

Up in the top corner is a torn piece of grey/blue paper featuring a music print and some blue baubles. I softened the torn edge with a thin brushing of white gesso. Hanging on pieces of White Pearl Garland, from a grey die cut branch there are some fussy cut blue, grey and pink baubles. To add to the snowy feel of this tag I added some texture paste both top and bottom and also just on the top of the baubles – I just used a paint brush to blob it on. There’s also a touch on the top edges of the three tags at the bottom. These are all die cut pieces included with the Paper Pad, and are sitting on a piece of frayed muslin. A triple circle of White Pearl Garland around the Merry & Bright sentiment finishes the tag off.

The same applies to my tags as to my cards…I have to have somewhere to write. So on the back I have added a small tag and a Silver Double Star charm.

Next, I started on the bolder and more exciting A Touch of Gold. Again, all the papers used are from the 6.5” Paper Pad. I have used the same paper as a base for the card and a lining for the envelope.

The gold line of gold trees, and the white pine needles are die cut, as is the cute christmas bird. If you look closely you will see that the bird’s eyes, his wing and his santa hat are all popped up on dimensional squares, as is the Love, Peace, Joy tag which is included in the Paper Pad.

The inside of this card has had the same treatment as the first one did, the only difference being that this one has a Gold Christmas Holly charm. It’s a very simple card – let’s face it, I’m not the best card maker in Scrapland :), but I think the great patterned papers in this paper pad make it look good.

My tag started out being for Christmas, but I think it could be used on a gift for any exciting occassion. The front and back of an Inkssentials Manilla Tag #8 are again covered with papers from the 6.5” Paper Pad.

I stamped the four balloons on a few different sheets of paper, cut them out, and then used them and several of the included die cut tags to build up some layers, with a tangle of golden yellow cotton between the last two of them. My cute bird is wearing a party hat this time, and I have used Gold Inka Gold to paint on its spots. This was also used to colour the backing filigree of my Black and Silver Celebrate Charming Word. Again I have used dimensional squares to add depth to the tag. Three of the balloons, the tags and the bird (as well as his wing, eyes, beak and hat) are all popped up. For added party bling I have embossed some of the edges using Gold Embossing Powder and added a few Golden Yellow and Clear Rhinestone Dots.

Again, on the back I have included a tag to write a message on.

Enjoy!!

CSI Special Investigator layout #2

My second layout for CSI as a September Special Investigator! Here’s the case file:

176 flat (2)


The theme is entertainment, and I’m afraid that I am past the bright lights, loud music and excitement of nightclubs, bars and parties. I much prefer a good book, some music and a cup of tea in my sun room, looking out over my sometimes unruly garden. (Not that I can’t be persuaded into a glass of wine or two now and again… LOL!!)

Every layout is unique, and what better way to make your layouts special than to use my2angels embellishments. You can use charms, flowers, Tracy’s amazing creativity and your own bits and pieces to make your layouts stand out from the crowd.

I’ve used torn up music paper and gesso to mute the background paper and form a base for my added texture. Just white texture paste through the Crafters Workshop Butterfly Collage Template. I wanted to add an edge to grunge up the paper just a little so I used the Kaisercraft Texture stamp – Film Edges, along with Stazon Timber Brown ink and Sky Blue Archival ink for this.

The ”tea” stains were made with Tea Dye Distress Ink and whatever round bottomed thing was on my desk at the time – I think it was the Texture Paste jar.

The blue ”shadows” under and around my embellishments and in the corners were brushed on with diluted Sky Blue Archival ink, along with a thin coat of Iridescent Medium which didn’t add any colour, but gave the dull ink a pretty shine.
There are three small embellishment clusters, each with its own my2angels addition. Besides the usual beautiful flowers – Baby Blue, Creamy Butter and Brown Cherry Blossoms, small Red Roses and Red Rose buds – there is a Silver Teapot charm coloured with Brown and Gold Inka Gold peeking out from under the flower….

Next, I made the bird embellishment using an Antique Bronze Square Filigree (I cut off the edge to make it round, and a bit smaller and more delicate), and a tiny bird from some patterned paper under a Transparent Glass Cabochon. Absolutely unique 🙂

Finally, framing another small bird, is a BEAUTIFUL, BRAND NEW my2angels creation. An Antique Bronze Heart with a rose scattered chain attached, finished with a pretty glass bead dangle. I’ll be needing this one in all colours! Love it!!

These will sell out FAST – get yours before I get them all…. LOL!

PS  (New stock is arriving next week so if you want the butterfly template or irridecent medium, let Tracy know before they sell out again)